industryELN for Production

Designed to meet the unique requirements of scientists working in production environments, where strict adherence to standard operating procedures (SOP) and standardized experiment notes is necessary.

Overview

Production environments demand rigorous documentation practices with strict adherence to standard operating procedures (SOPs), structured workflows, and comprehensive compliance requirements. The ELN for Productionarrow-up-right application provides a specialized electronic lab notebook designed for manufacturing, quality control, and production laboratory settings where standardized experiment documentation is essential for regulatory compliance and operational excellence.

By structuring experiments into organized Sections, the ELN for Production enables scientists to efficiently capture all necessary details while following standardized procedures. The application guides users through structured workflows—from sample preparation and equipment scheduling to procedure execution, result documentation, and electronic signatures—ensuring that every production experiment meets industry standards including GMP, GLP, and FDA 21 CFR Part 11 compliance requirements.

ELN for Production showing structured sections for experiment documentation
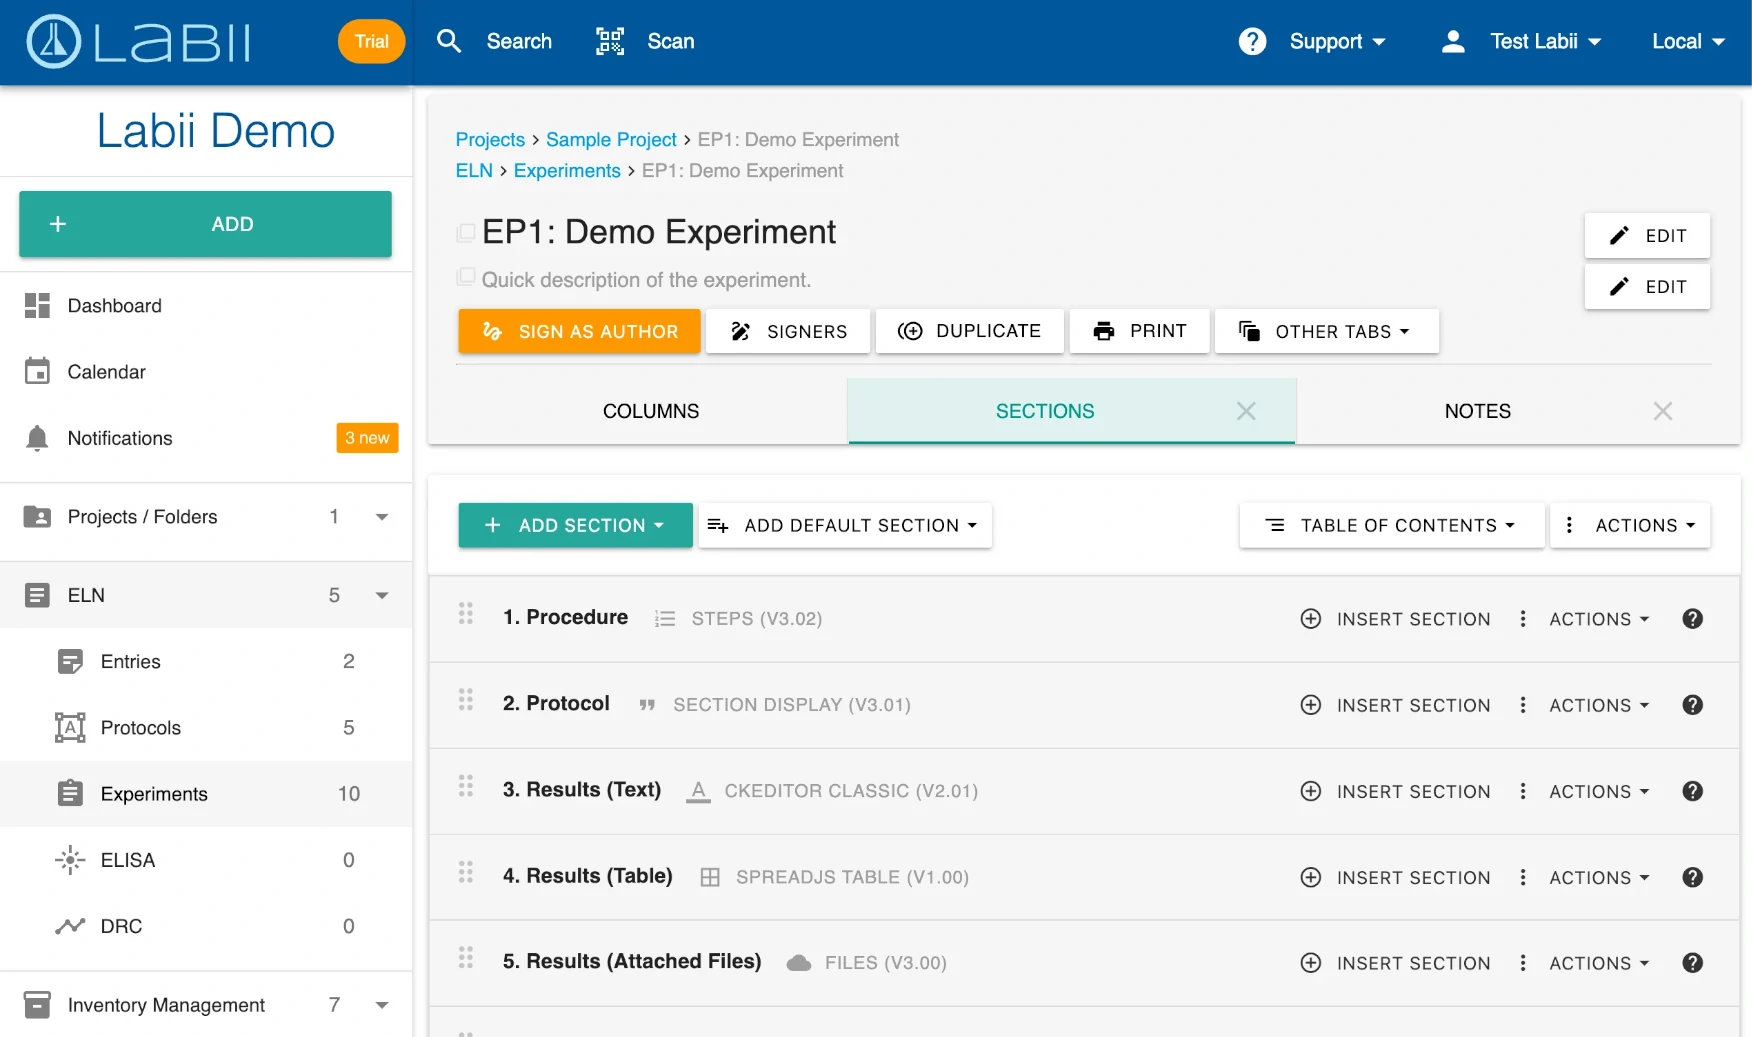
ELN for Production organizes experiments into structured sections for efficient, compliant documentation
circle-info

The ELN for Production is ideal for regulated environments requiring structured documentation, standardized procedures, and comprehensive audit trails for quality assurance and regulatory inspections.

Use Cases

Pharmaceutical Manufacturing

  • Document batch production experiments following GMP requirements

  • Execute and record validated analytical methods

  • Track raw material usage and lot numbers

  • Maintain complete batch records for regulatory submissions

  • Support FDA inspections with comprehensive audit trails

Biopharmaceutical Production

  • Document cell culture production runs

  • Record bioreactor operations and parameters

  • Track biologics manufacturing processes

  • Maintain compliance with regulatory guidelines

  • Document purification and formulation procedures

Quality Control Laboratories

  • Execute standardized testing protocols

  • Document routine analytical testing procedures

  • Record method validation experiments

  • Track out-of-specification (OOS) investigations

  • Maintain equipment qualification records

Chemical Manufacturing

  • Document chemical synthesis in production scale

  • Record process development experiments

  • Track scale-up procedures and parameters

  • Maintain safety-critical documentation

  • Support process validation activities

Food and Beverage Testing

  • Document product testing procedures

  • Execute standardized quality control tests

  • Record shelf-life stability studies

  • Track compliance with food safety regulations

  • Maintain HACCP-compliant documentation

Medical Device Manufacturing

  • Document production verification experiments

  • Record design validation testing

  • Track manufacturing process validations

  • Maintain compliance with ISO 13485

  • Support regulatory submissions and audits

Getting Started

1

Navigate to Settings → Applications from the main menu

2

Click Add application and select Add from a template

3

Choose Electronic Lab Notebook (ELN) for Production from the template list

circle-exclamation
4

Wait for the installation to complete. The system will automatically create:

  • experiment table for structured production experiments

  • protocol table for standard operating procedures

5

Access the newly created tables from the side menu to begin documenting production experiments

Application Structure

Experiment Table

The experiment table is designed for documenting production experiments with structured workflows and standardized sections.

Purpose: Record production experiments following established SOPs with comprehensive documentation

Key Columns:

  • Account: Links the experiment to a specific customer or internal account

  • Order: Associates the experiment with a specific order or work request

  • Date Start: Experiment start date (required)

  • Date Due: Expected completion date for planning and scheduling

  • Signature Status: Tracks signature workflow (Unsigned, Signed, Witnessed)

Key Sections:

  • Experiment Workflow: Interactive guide for completing production experiments step-by-step

  • Experiment Overview: Summary and purpose of the experiment

  • Samples: Sample inventory and consumption tracking

  • Equipment: Equipment used and scheduling information

  • Procedure: Step-by-step protocol execution

  • Results: Structured result documentation

Typical Use: GMP batch records, quality control testing, process validation, manufacturing experiments

Protocol Table

The protocol table manages standard operating procedures and validated methods.

Purpose: Create and maintain standardized procedures for production experiments

Key Columns:

  • status: Tracks protocol lifecycle (Drafting, Pending Review, Finalized, Archived)

Key Sections:

  • Steps: Structured widget for sequential protocol instructions

  • Steps (Text): Rich text editor for detailed procedural descriptions

  • Documents (Attached Files): Supporting documentation including SDSs, specifications, and references

Typical Use: Standard operating procedures, analytical methods, manufacturing procedures, test protocols

Creating a New Production Experiment

1

Navigate to the experiment table from the side menu or search for "experiment"

2

Click the + Add button at the top of the table list view

3

Fill in the required experiment details:

  • Name: Descriptive experiment title (e.g., "Batch 2024-001 Manufacturing Run")

  • Date Start: Experiment start date (required)

  • Date Due: Expected completion date

  • Account: Customer or internal account (if applicable)

  • Order: Associated order number (if applicable)

  • Project: Link to relevant project

4

Click Save to create the experiment. The detail view opens with the Experiment Workflow section visible

5

Follow the guided workflow to complete your production experiment systematically

Following the Production Experiment Workflow

The Experiment Workflow section provides a structured, step-by-step guide for completing production experiments efficiently and compliantly.

Production experiment workflow showing sequential steps from sample preparation to signature
The experiment workflow guides users through each stage of production documentation

Step 1: Provide Experiment Overview

1

In the Experiment Workflow section, click Open Overview to access the overview section

2

Document the experiment purpose, scope, and any special considerations

3

Include references to relevant SOPs, protocols, or specifications

4

Return to the workflow section to proceed to the next step

Step 2: Add Samples and Reagents

1

Click Open Samples in the experiment workflow to access the Samples section

2

Click Scan to add samples by scanning barcodes or QR codes

3

Alternatively, manually add samples by selecting them from your inventory

4

Specify the quantity used for each sample. Labii automatically records consumption and updates inventory

5

Verify all required samples and reagents are documented before proceeding

circle-check

Step 3: Add and Schedule Equipment

1

In the workflow section, click Open Equipment to access equipment documentation

2

Scan equipment barcodes or select equipment from your equipment inventory

3

Schedule equipment usage by specifying the time slot required

4

Verify equipment calibration status and qualification records

5

Document any equipment settings or parameters relevant to the experiment

Step 4: Load or Create Procedure Steps

1

Click Open Procedure in the experiment workflow

2

Click Actions → Load data from section to import steps from an existing protocol

3

Select the appropriate SOP or protocol from the protocol table

4

The procedure steps will populate automatically in the Procedure section

5

If creating a new procedure, manually add steps using the Steps widget or rich text editor

circle-info

Loading procedures from validated protocols ensures consistency and compliance across production experiments while saving documentation time.

Step 5: Execute the Experiment

1

Follow each step outlined in the Procedure section sequentially

2

Check off steps as completed or add execution timestamps as required

3

Document any deviations from the procedure in real-time

4

Record in-process observations and measurements

5

Add photos or attachments of critical observations using the camera or file upload functions

Step 6: Document Results

1

Click Open Results or navigate to the Results section

2

Add appropriate result widgets based on your data type:

  • Use Table widget for tabular data

  • Use Rich Text widget for narrative results

  • Use Chart widget for graphical data visualization

  • Use File widget for instrument data files

3

Enter all experimental results, measurements, and observations

4

Include acceptance criteria and pass/fail determinations

5

Attach supporting data files, chromatograms, spectra, or images

Step 7: Review and Sign the Experiment

1

Review all sections of the experiment for completeness and accuracy

2

Click Open Signatures Section in the workflow or navigate to the Signers tab

3

Add any required co-signers (reviewers or witnesses) before signing

4

Click Sign to electronically sign the experiment

5

Enter your password to authenticate your signature

6

Co-signers receive notifications and can review and sign the experiment

circle-exclamation

Creating and Managing Production Protocols

1

Navigate to the protocol table from the side menu

2

Click + Add to create a new protocol

3

Fill in the protocol details:

  • Name: Clear protocol title (e.g., "SOP-QC-001: HPLC Analysis Method")

  • Status: Set to "Drafting" for new protocols

  • Description: Brief purpose and scope of the protocol

4

Add protocol steps using the Steps section for structured instructions:

  • Number each step sequentially

  • Include clear, actionable instructions

  • Specify critical parameters and acceptance criteria

  • Add safety warnings where appropriate

5

Alternatively, use the Steps (Text) section for narrative-style protocols with the rich text editor

6

Attach supporting documents in the Documents section:

  • Equipment operating manuals

  • Safety data sheets (SDS)

  • Validation reports

  • Method specifications

  • Reference standards certificates

7

Update the Status as the protocol progresses through review and approval:

  • Drafting: Under development

  • Pending Review: Ready for quality assurance review

  • Finalized: Approved and validated for use

  • Archived: Superseded or retired protocols

Working with Structured Sections

The ELN for Production organizes experiments into logical sections, making it easy to locate specific data without reviewing the entire record.

Adding Sections to Experiments

1

Open an experiment in detail view and click on the Sections tab

2

Click + Add Section to add a new section widget

3

Select the appropriate widget type from the widget gallery:

  • Rich Text: For narrative documentation

  • Table: For structured data entry

  • Steps: For procedural checklists

  • Files: For attachments and documents

  • Images: For photos and diagrams

4

Configure the section name and settings

5

Click Save to add the section to your experiment

For comprehensive information about working with sections, see Sections.

Organizing Section Order

1

In the Sections tab, click the Organize button

2

Drag and drop sections to reorder them logically

3

Click Save to apply the new section order

Electronic Signatures for Production Records

Electronic signatures certify the accuracy and completeness of production records, ensuring regulatory compliance and creating legally defensible documentation.

Understanding Signature Requirements

By signing a production experiment, you are certifying that:

  • The documented procedures were followed accurately

  • The recorded data is complete and accurate to the best of your knowledge

  • The experiment meets all applicable quality standards

  • The record satisfies regulatory requirements such as FDA 21 CFR Part 11

  • The documentation can support audits, inspections, and legal proceedings

Signing a Production Experiment

1

Complete all required sections of the experiment

2

Review the entire experiment for accuracy and completeness

3

Navigate to the Signers tab at the top of the detail view

4

If required, click Add Co-Signer and select reviewers or witnesses who must also sign

5

Click Sign to add your electronic signature

6

Enter your password to authenticate your signature. This creates a legally binding signature

7

Co-signers receive email notifications and can review and sign the experiment through the link provided

circle-info

Co-signers can include quality assurance reviewers, supervisors, or witnesses required by your quality system.

For detailed information about the signature process, see Signers.

Maintaining Complete Audit Trails

Labii automatically maintains comprehensive audit trails for all production experiments, satisfying regulatory requirements for data integrity and traceability.

Version Control

Every change to an experiment creates a new version:

  • Review complete change history with before/after comparisons

  • Identify who made changes and when

  • Restore previous versions if needed

  • Demonstrate data integrity during audits

Access version history in the Versions tab.

Activity Logging

The Activities log captures all actions:

  • Record creation and modifications

  • Section additions, edits, and deletions

  • Column value changes

  • Signature and witness events

  • File attachments and removals

  • Status changes

View the activity log in the Activities tab.

Access Tracking

The Visitors log records all access to experiments:

  • View timestamp for each user access

  • Identify who has reviewed records

  • Demonstrate access control for compliance

  • Support audit trail requirements

Check access history in the Visitors tab.

circle-check

Managing Experiments in List View

The table list view provides powerful tools for managing production experiments efficiently.

Viewing and Filtering

  • Search experiments by name, account, order, or content

  • Apply filters to show specific subsets (e.g., unsigned experiments, specific date ranges)

  • Sort by columns such as start date, due date, or signature status

  • Switch between list, grid, and calendar views

  • Save custom views for frequently used filters

Bulk Operations

  • Select multiple experiments using checkboxes

  • Apply bulk actions such as:

    • Adding tags for categorization

    • Exporting to PDF or Excel

    • Moving to different projects

    • Updating column values across multiple records

    • Archiving completed experiments

For comprehensive information about list view features, see list view documentation.

Printing and Exporting Production Records

1

Open the experiment in detail view

2

Click the More menu (three dots) at the top right

3

Select Print from the dropdown menu

4

Review the print preview showing all sections, signatures, and audit information

5

Choose to print to paper or save as PDF for archival, regulatory submissions, or distribution

circle-info

PDF exports include all sections, electronic signatures, and audit trail information, creating a complete record suitable for regulatory submissions.

Learn more about printing options at Print.

Advanced Features

Linking Experiments and Protocols

Create connections between related experiments and reference protocols:

1

Open an experiment in detail view

2

Add a Rich Text or Table section widget

3

Use the insert link function to reference related protocols, previous experiments, or specifications

4

Users can click these links to navigate directly to referenced records, creating an interconnected documentation system

Creating Experiment Templates

Standardize recurring experiment types with templates:

1

Create an experiment with your desired structure (sections, columns, standard content)

2

Complete all standard sections and formatting

3

In the list view, select the experiment and click Duplicate

4

Use the duplicated experiment as a template for similar production runs

circle-check

Loading Data from Previous Experiments

Reuse data from previous experiments:

1

Open the target experiment and navigate to the desired section

2

Click Actions → Load data from section

3

Select a previous experiment to copy data from

4

Choose the specific section to import

5

The data populates automatically, maintaining traceability to the source


The ELN for Productionarrow-up-right application provides a comprehensive solution for scientists working in regulated production environments. With structured workflows, standardized documentation, comprehensive audit trails, and electronic signature capabilities, the application ensures that production experiments meet strict SOP requirements and regulatory standards including GMP, GLP, and FDA 21 CFR Part 11 compliance, while optimizing efficiency and data integrity in pharmaceutical, biopharmaceutical, chemical manufacturing, and quality control laboratories.

Last updated